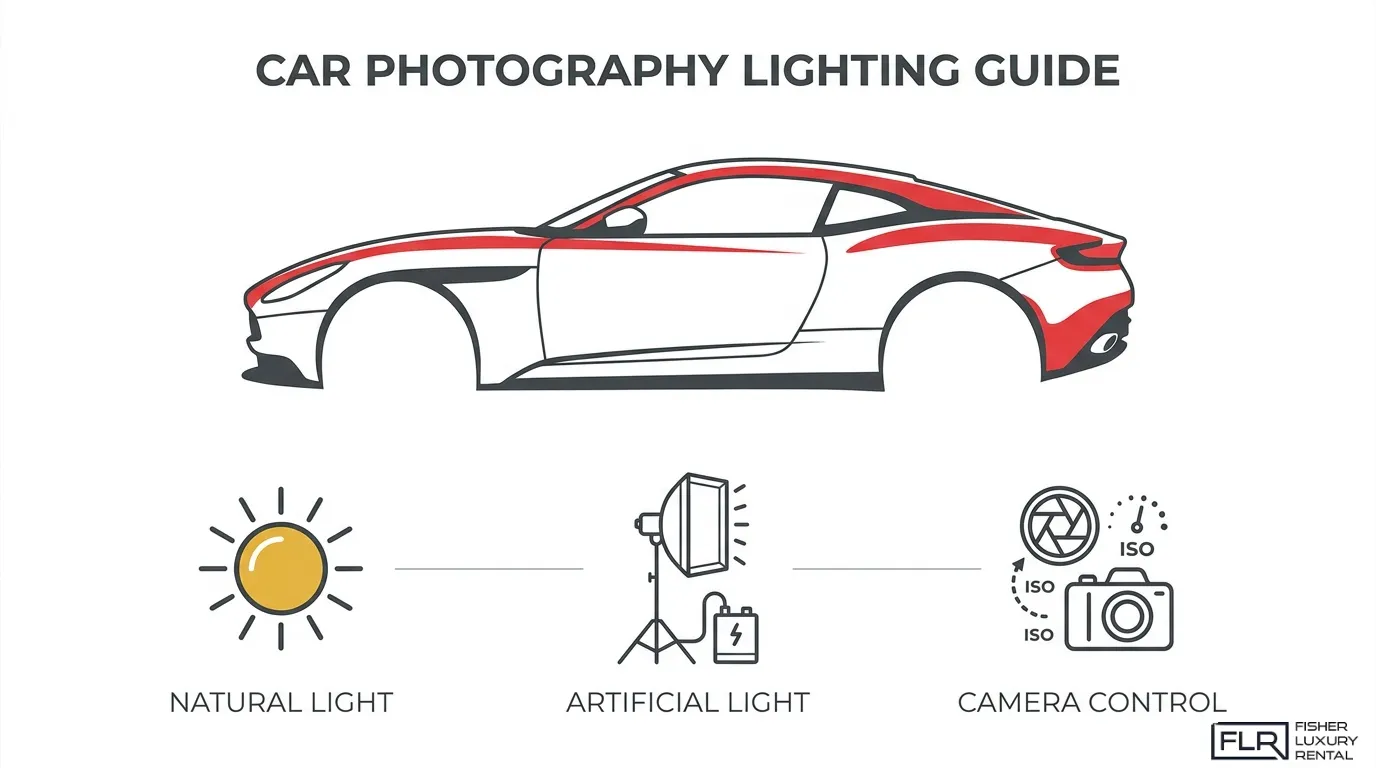
Car photography lighting is the practice of selecting, positioning, and controlling light sources to accurately reveal a vehicle’s paint finish, body lines, and design details in a photograph.
This guide covers light sources and timing, reflection and glare control, advanced techniques like light painting, studio and indoor setups, camera settings, finish-specific lighting, common mistakes, and post-processing.
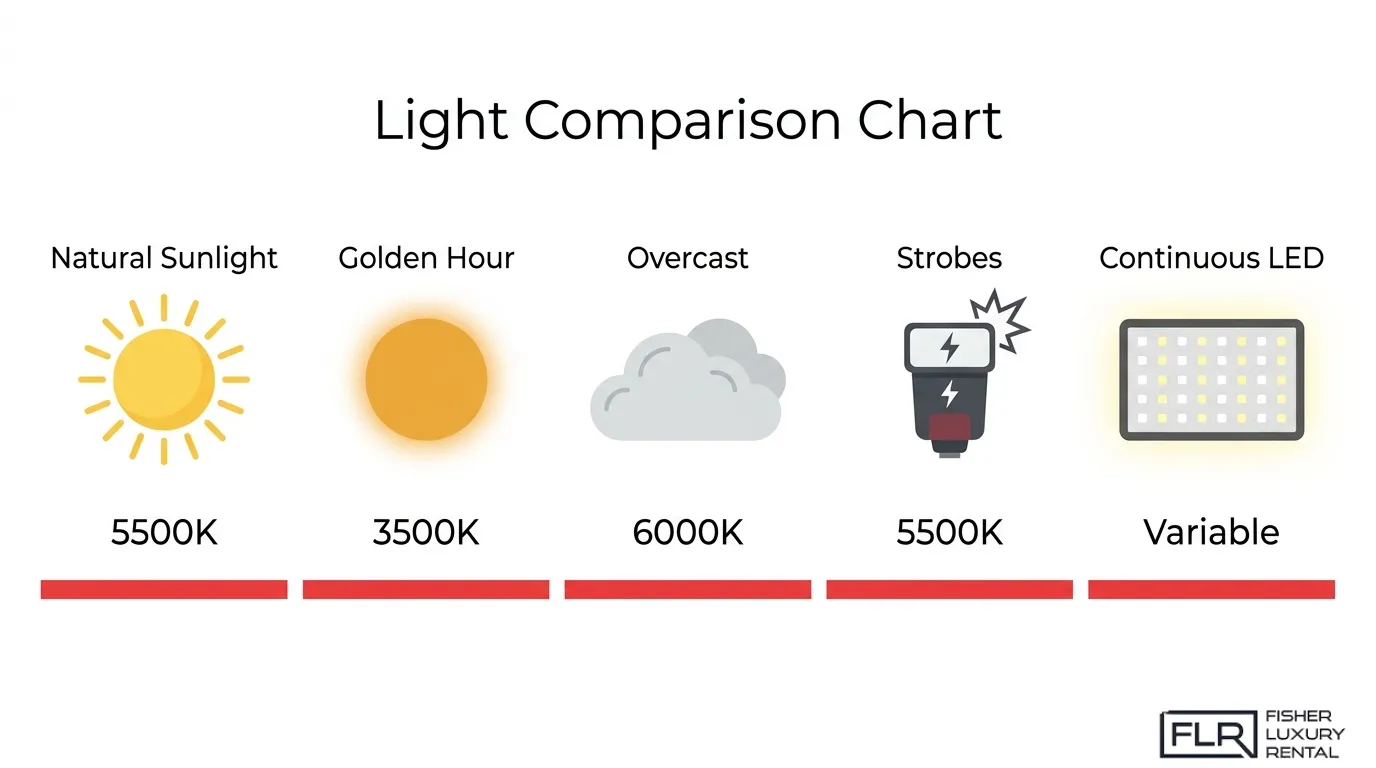
Natural and artificial light each serve distinct roles. Natural sunlight provides high-intensity ambient coverage, golden hour wraps bodywork in warm, directional tones at roughly 3,500K, overcast skies act as a uniform softbox at around 6,000K, and artificial strobes or continuous LEDs give full control when conditions are fixed.
Timing and reflection management are closely linked. Blue hour, when the sun sits 4 to 8 degrees below the horizon, creates a balanced ambient environment for artificial fill, while midday sun produces harsh overhead contrast that flattens body lines. A circular polarizer positioned at 90 degrees to the sun, combined with deliberate car placement and black or white panel flags, eliminates the majority of glare problems before any editing begins.
Light painting, studio setups, and finish-specific approaches each require tailored settings. Manual mode at ISO 100-200, f/11, and a 10 to 30-second exposure underpins effective light painting, while indoor key lights, softboxes, and strip lights shape reflections precisely across black, white, metallic, and matte finishes. Post-processing in Lightroom, Photoshop, or Capture One refines what the camera captures, correcting exposure, white balance, and residual reflections for a polished final result.
Why Does Lighting Matter So Much in Car Photography?
Lighting matters so much in car photography because it directly controls how a vehicle’s shape, finish, and design lines are perceived in the final image. The sections below explain how lighting affects paint accuracy, reflection behavior, and the overall visual impact of automotive shots.
How Does Lighting Affect the Appearance of Car Paint and Finish?
Lighting affects the appearance of car paint and finish by revealing or flattening the surface characteristics unique to each finish type. Metallic paints shift in tone depending on light angle, pearlescent finishes show their color-shifting depth only under directional light, and matte wraps lose their texture under harsh point sources.
According to Spyne, lighting maintains accurate paint and finish tones across metallic, matte, and pearl finishes, defines shape, depth, and design lines, controls reflections on high-gloss surfaces, and supports faster buyer decisions. Getting this right is not just an aesthetic choice; it directly shapes how a viewer interprets the car’s condition and quality.
Why Is Lighting Critical for Capturing Car Body Lines and Curves?
Lighting is critical for capturing car body lines and curves because highlights and shadows are what make contours readable in a two-dimensional photograph. Without deliberate light placement, a sculpted hood or a pronounced side crease disappears into a flat, toneless surface.
Specular reflections running along a car’s body act as natural edge-defining tools when the light source is positioned correctly. This is why professional automotive photographers prioritize long, controlled light sources that create smooth, continuous reflections along panel edges rather than short bursts that create scattered hot spots.
How Does Poor Lighting Damage the Quality of Car Photos?
Poor lighting damages the quality of car photos by introducing harsh shadows, blown-out highlights, and distracting reflections that misrepresent the vehicle’s actual condition and finish. These errors are difficult to fully correct in post-processing once the exposure data is lost.
According to SLR Lounge, common mistakes in automotive photography include not using the right gear such as a quality tripod and circular polarizer, lack of remote triggers, poor location choice, and dirty car surfaces. In practice, bad lighting choices compound these errors: a dirty car under direct midday sun, for example, renders every surface flaw in merciless detail while simultaneously destroying tonal range across the paintwork.
What Are the Best Types of Light for Car Photography?
The best types of light for car photography are natural sunlight, golden hour light, overcast diffused light, artificial strobes, and continuous LED lighting. Each light source serves a different purpose, from revealing paint depth to controlling reflections.
How Does Natural Sunlight Work for Car Photography?
Natural sunlight works by providing the highest-intensity ambient light available, giving car photos strong contrast and vivid color saturation. Direct sun is most useful during early morning or late afternoon, when the angle is low enough to skim across body panels and accentuate design lines without creating blown-out hotspots on reflective surfaces. Harsh overhead sun mid-session can flatten the car’s shape and introduce unmanageable glare. For night sessions under available light, Sony Scene recommends starting at ISO 800-1600, adjusting downward when shooting light trails or a moving car with a slower shutter speed.
How Do You Use Golden Hour Light for Car Shoots?
Golden hour light works by wrapping the car in warm, directional tones that flatter both metallic and gloss paint finishes. According to Wikipedia, golden hour color temperature sits around 3,500K, dropping to roughly 2,000K just after sunrise or before sunset, compared to 5,500K at midday. That lower Kelvin range produces the amber glow that makes bodywork appear rich and dimensional. Set ISO to 200-400 during golden hour to preserve image quality in the softer light. Blue hour, which occurs when the sun is between 4 and 8 degrees below the horizon, extends the shooting window with a deep, even blue sky that balances naturally against artificial fill lights.
How Does Overcast Light Benefit Car Photography?
Overcast light benefits car photography by turning the entire sky into one large, uniform softbox. According to ResearchGate data, diffuse light under an overcast sky produces an average color temperature of 6,000 Kelvin, which is neutral and easy to white-balance in post. More importantly, the absence of a single hard light source eliminates the concentrated specular reflections that plague gloss and metallic finishes under direct sun. Overcast conditions are particularly forgiving for beginners because the light quality remains consistent across the full length of a shoot rather than shifting rapidly as the sun moves.
How Do Artificial Strobes and Flashes Improve Car Photos?
Artificial strobes improve car photos by giving the photographer complete control over light direction, intensity, and quality regardless of time of day or weather. Strobes allow precise placement to define character lines, separate the car from its background, or fill in shadow areas that ambient light cannot reach. For car photography, strobes in the 400-600 watt-second range are ideal, with larger modifiers producing softer, more even coverage across wide body panels. Professional studio setups often bounce strobe output off large rigid white panels rather than firing through scrims, generating the broad, controlled reflections that define high-end automotive work.
How Does Continuous LED Lighting Work for Car Shoots?
Continuous LED lighting works by emitting a steady, adjustable beam that lets photographers see exactly how light falls on the car before the shutter fires. Unlike strobes, LEDs provide a live preview of highlights and shadows on paint, making it straightforward to identify and correct unwanted reflections in real time. Modern bi-color LED panels are tunable across a wide Kelvin range, allowing the shooter to match ambient conditions or create deliberate contrast between warm and cool sources. For indoor artificial-light shoots, ISO 400-800 is a practical starting point, adjusting up or down based on LED output intensity.
With an understanding of each light source’s strengths, the next step is choosing the right time of day to put them to work.
What Is the Best Time of Day to Photograph a Car?
The best time of day to photograph a car is during golden hour, blue hour, or shortly after sunrise. Each window offers distinct light qualities that flatter automotive curves, paint, and finish. The sections below cover how sunrise and sunset compare, why blue hour excels for dramatic shots, and why midday should be avoided.
How Does Sunrise Compare to Sunset for Car Photography?
Sunrise and sunset produce nearly identical golden hour light, but each carries a different practical advantage. Sunrise offers cooler, calmer conditions with minimal traffic, cleaner air, and empty locations, making it easier to control your shoot environment. Sunset delivers warmer, slightly more saturated tones as the atmosphere thickens throughout the day, and it allows more preparation time beforehand. Both windows share a color temperature of approximately 3,500K, casting warm, low-angle light that wraps naturally around body lines and reduces harsh shadows. For most photographers, sunrise is the more disciplined choice; sunset is the more accessible one.
Why Is Blue Hour Ideal for Dramatic Car Shots?
Blue hour is ideal for dramatic car shots because it creates a naturally balanced exposure between ambient sky light and artificial lighting on the car. According to LightPlan, blue hour occurs when the sun sits between 4 and 8 degrees below the horizon, producing a deep, even blue sky. This uniform ambient light eliminates the contrast extremes of direct sunlight, allowing artificial lights, strobes, or light painting to illuminate the car precisely without competing with a bright sky. The result is a cinematic, studio-quality look achieved entirely on location.
Why Should You Avoid Midday Sun for Car Photography?
Midday sun is the worst lighting condition for car photography because it creates harsh overhead light, severe shadows, and uncontrollable specular reflections on paint and glass. The sun sits directly overhead, producing flat, unflattering illumination with no directional quality to define body lines or curves. According to Sony Scene, daytime car photography requires a shutter speed around 1/250s and ISO between 100 and 200, yet even with correct exposure, the quality of midday light cannot be corrected in-camera. High contrast between roof panels and lower body panels also creates blown highlights and blocked shadows in the same frame, complicating post-production significantly.
How Do You Control Reflections and Glare on Car Paint?
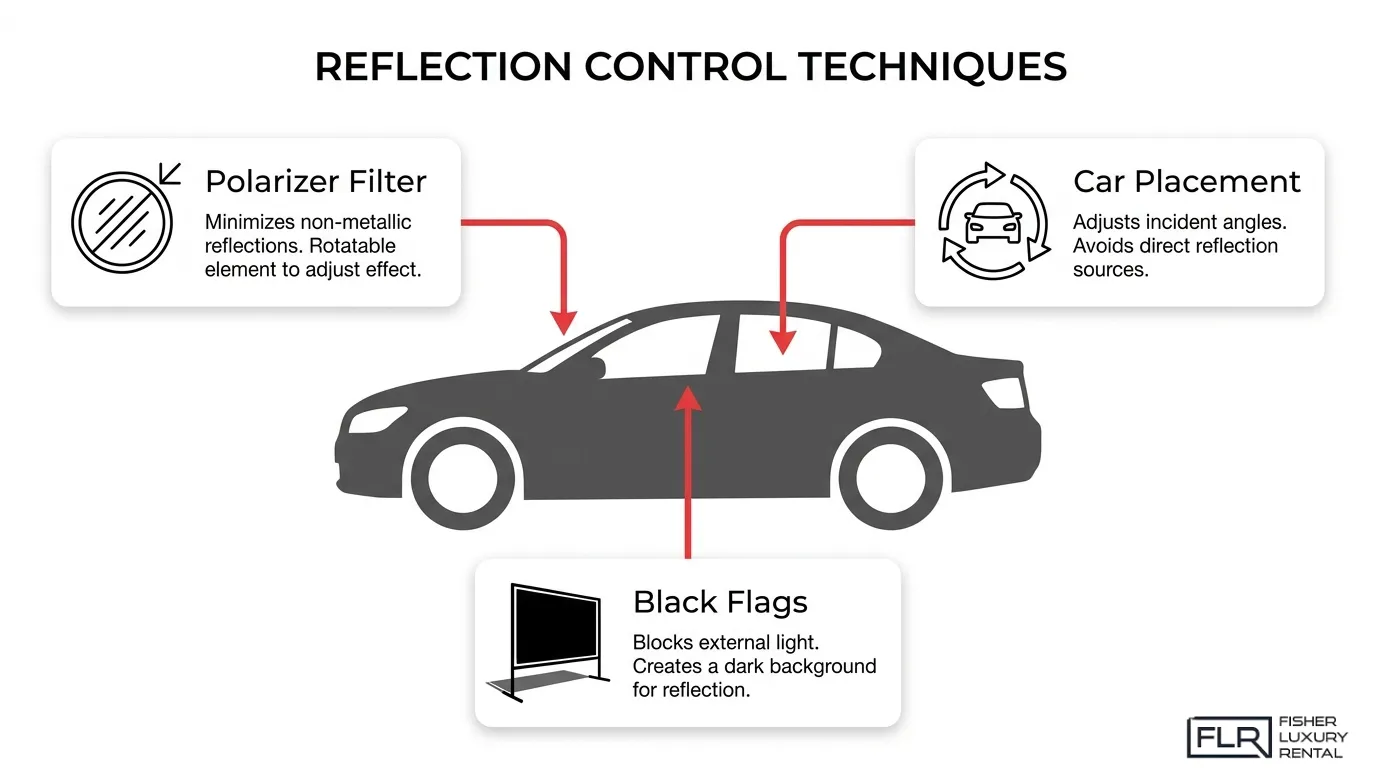
Controlling reflections and glare on car paint requires a combination of equipment, positioning, and lighting tools. The following sections cover polarizing filters, car placement strategies, and panel-based reflection control.
How Does a Polarizing Filter Reduce Glare on Car Bodies?
A polarizing filter reduces glare on car bodies by blocking light waves that bounce off reflective surfaces at specific angles. According to DPReview, a circular polarizing filter is most effective when positioned at 90-degree angles to the sun, making it particularly useful for managing reflections on both paint and glass surfaces. Rotating the filter while looking through the viewfinder lets you dial in the exact level of glare reduction needed. This single piece of equipment can dramatically clean up a shot without requiring repositioning the car or adjusting ambient light.
How Do You Position the Car to Minimize Unwanted Reflections?
Positioning the car to minimize unwanted reflections means placing it so that bright, uncontrolled light sources such as the sun, buildings, and open sky do not fall directly in the reflected angle visible to the lens. Parking the car parallel to a large, even surface like a wall or treeline creates softer, more uniform reflections across the paint. Rotating the car slightly relative to the camera shifts which surfaces catch direct light, giving you precise control over where highlights land on the bodywork.
How Do You Use Flags and Black Panels to Control Reflections?
Flags and black panels control reflections by blocking unwanted light sources from appearing in the car’s surface. Positioned between the car and any bright ambient source, black panels absorb light rather than reflecting it back, eliminating hotspots on high-gloss paint. For more deliberate light shaping, professional car studio lighting setups use reflected light bounced off rigid frames fitted with highly reflective plastic white panels, rather than diffusing light through scrims, to achieve precise control over the reflection shape and placement on the bodywork. Combining both black and white panels gives photographers full command over shadow depth and highlight quality simultaneously.
How Do You Use Light Painting for Stunning Car Photos?
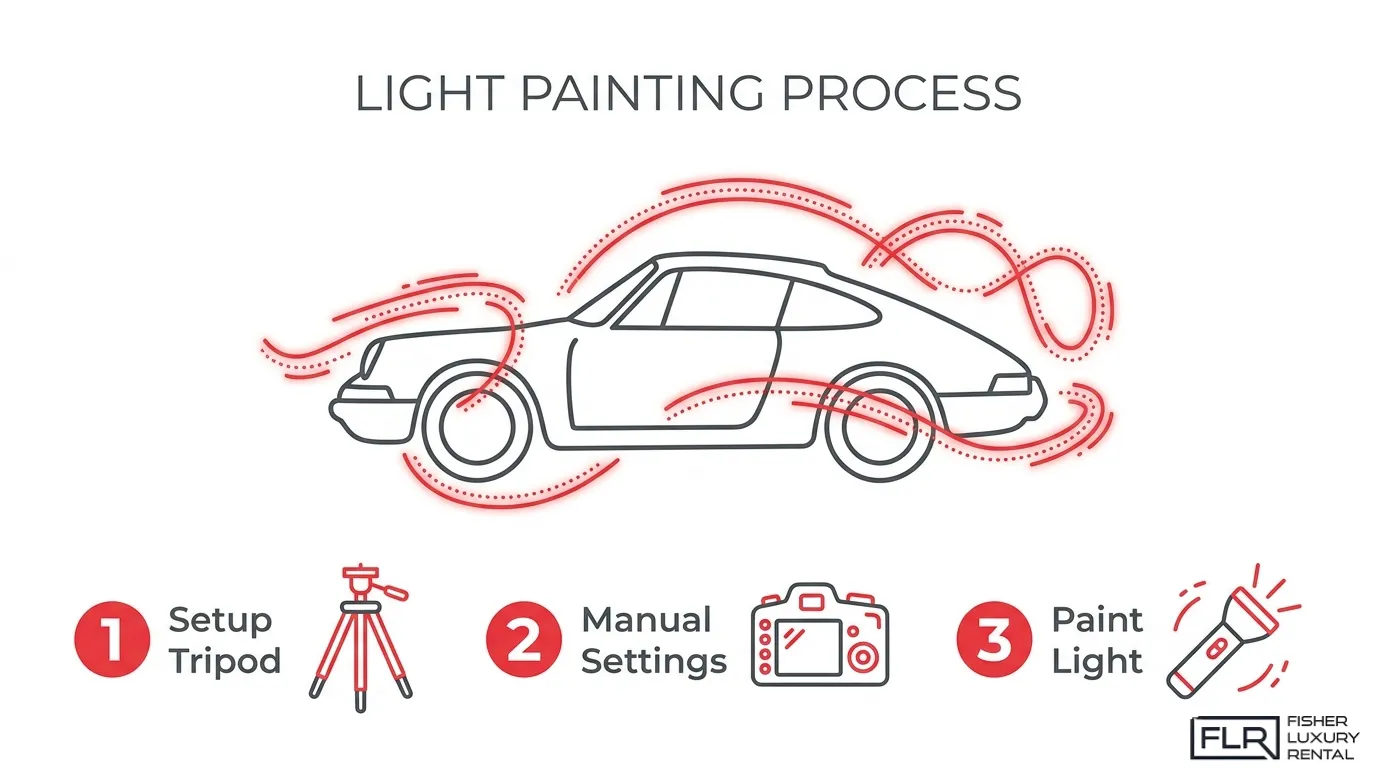
Light painting is a technique that combines long-exposure photography with a handheld light source moved deliberately over the car’s surface in a dark environment. The sections below cover the equipment you need, the correct camera exposure settings, and how to move your light source effectively.
What Equipment Do You Need for Car Light Painting?
The equipment you need for car light painting includes a sturdy tripod, a camera with full manual controls, a remote shutter release, and a handheld continuous light source such as an LED wand, flashlight, or speedlight.
Key gear for a car light painting session:
- Tripod: Keeps the camera perfectly still during exposures of 10 to 30 seconds.
- Remote shutter release: Eliminates camera shake when triggering long exposures.
- LED wand or flashlight: Provides a controllable, directional light source to sweep across panels.
- Circular polarizer (optional): Reduces unwanted reflections on gloss paint, though it causes a 1 to 2 stop light loss depending on brand and positioning.
- Dark or very low-light environment: Essential so ambient light does not compete with your painted light.
A location with near-zero ambient light gives you the most control over which surfaces receive illumination.
How Do You Set Camera Exposure for Light Painting a Car?
Camera exposure for light painting a car is set in Manual (M) mode, with ISO 100 to 200, an aperture of approximately f/11, and a shutter speed between 10 and 30 seconds. According to Canon Europe, these settings keep noise minimal, maintain deep depth of field across the full vehicle, and provide enough time to walk the light source around the car during a single exposure.
Keep white balance fixed rather than set to Auto, so colors remain consistent across multiple test exposures as you refine your light path.
How Do You Move the Light Source During a Car Light Paint?
Moving the light source during a car light paint requires sweeping it in smooth, overlapping passes across each body panel, keeping the beam angled toward the surface rather than the lens to avoid hotspots. Work panel by panel, starting from the farthest sections and moving forward, while staying low enough that you do not appear in the frame.
Practical movement guidelines:
- Keep constant motion: Pausing in one spot creates an overexposed hotspot on the paint.
- Feather panel edges: Overlap adjacent panels slightly so tonal transitions appear gradual.
- Repeat passes for darker finishes: Dark paint absorbs more light and may need two slow passes to render correctly.
- Stay out of the frame: Wear dark clothing so your body remains invisible during the exposure.
Light painting is one of the few techniques that falls almost entirely within that rare 5% of photography lit purely by artificial light, making mastery of your hand movements as important as any camera setting. Exotic vehicles with dramatic body lines and deep metallic or gloss finishes — like those available through Fisher Luxury Rental — tend to reward light painting particularly well, as their sculpted panels respond vividly to carefully directed handheld light.
How Do You Light a Car in a Studio or Indoor Setting?
Studio lighting gives photographers complete control over every reflection, shadow, and highlight on a car’s body. The following sections cover key light placement, softbox and strip light techniques, and background separation.
How Do You Set Up a Key Light for an Indoor Car Shoot?
Setting up a key light for an indoor car shoot starts with positioning a large, powerful strobe at roughly a 45-degree angle to the front quarter panel. This placement shapes the car’s body lines while preventing flat, directionless illumination. Strobes around 400-600 watt-seconds are ideal when paired with a quality modifier, as higher power delivers cleaner separation between lit and shadow areas.
For camera settings, ISO 400-800 is a good starting point for indoor shoots with artificial lighting, adjusted based on your strobe’s output intensity, according to Sony Scene’s automotive photography guide.
How Do You Use Softboxes and Strip Lights on Car Bodywork?
Softboxes and strip lights shape the long, uninterrupted reflections that define a car’s body panels and design lines. Large softboxes placed parallel to the car’s side create broad, gradient highlights across the doors and fenders. Strip lights, positioned above and below the car’s roofline, accentuate creases and shoulder lines with sharp, defined edge reflections.
Professional studio setups often use reflected light off rigid white panels rather than bare modifiers, giving precise control over where reflections fall on high-gloss paint surfaces.
How Do You Light the Background Separately From the Car?
Lighting the background separately from the car prevents the car’s key lights from contaminating the backdrop tone. Dedicated background lights, placed behind the car and aimed at the cyclorama or seamless paper, allow independent control of background brightness and color.
Raising the background slightly brighter than the car creates a clean, commercial separation; matching it to mid-gray produces a neutral, shadow-free look. This separation is especially important for dark-colored vehicles, where contrast between car and background defines the vehicle’s silhouette clearly.
What Camera Settings Work Best for Car Photography Lighting?
The best camera settings for car photography lighting depend on the shooting condition, such as daylight, golden hour, night, or indoor studio. Aperture, shutter speed, and ISO each need adjustment to match the available light and the effect you want.
What Aperture, Shutter Speed, and ISO Should You Use in Daylight?
For daytime car photography, use an aperture of f/4.5 or higher to keep the entire vehicle sharp, a shutter speed of around 1/250s to freeze motion, and ISO between 100 and 200. According to Sony Scene’s automotive photography guide, these settings preserve image quality while controlling exposure in bright outdoor conditions. A low ISO minimizes digital noise, which matters most on reflective paint surfaces where grain becomes obvious.
What Camera Settings Work for Golden Hour or Overcast Conditions?
For golden hour or overcast car photography, raise ISO to 200-400 to compensate for reduced light while maintaining image quality. The aperture range remains around f/4.5 to f/8 to keep the car in focus, with shutter speed adjusted accordingly. Overcast light is softer and more forgiving, so the risk of blown highlights on metallic paint is lower compared to midday shooting.
What Settings Should You Use for Night Car Photography?
For night car photography, start with ISO 800-1600 to capture enough ambient light. If shooting light trails or slow-motion effects, reduce ISO and use a slower shutter speed to balance the exposure. A tripod is essential at these settings since any camera movement will ruin the shot. Night shoots reward patience, as small adjustments to ISO and shutter speed produce dramatically different results.
What Camera Settings Work for Indoor Studio Car Photography?
For indoor car photography with artificial lighting, ISO 400-800 is the recommended starting point, adjusted based on strobe or LED intensity. Aperture typically stays between f/8 and f/11 to render the full vehicle in focus, and shutter speed syncs to the flash. Stronger lighting setups allow a lower ISO, which keeps the paint tones cleaner and reduces post-processing work.
How Do You Light Different Car Colors and Finishes?
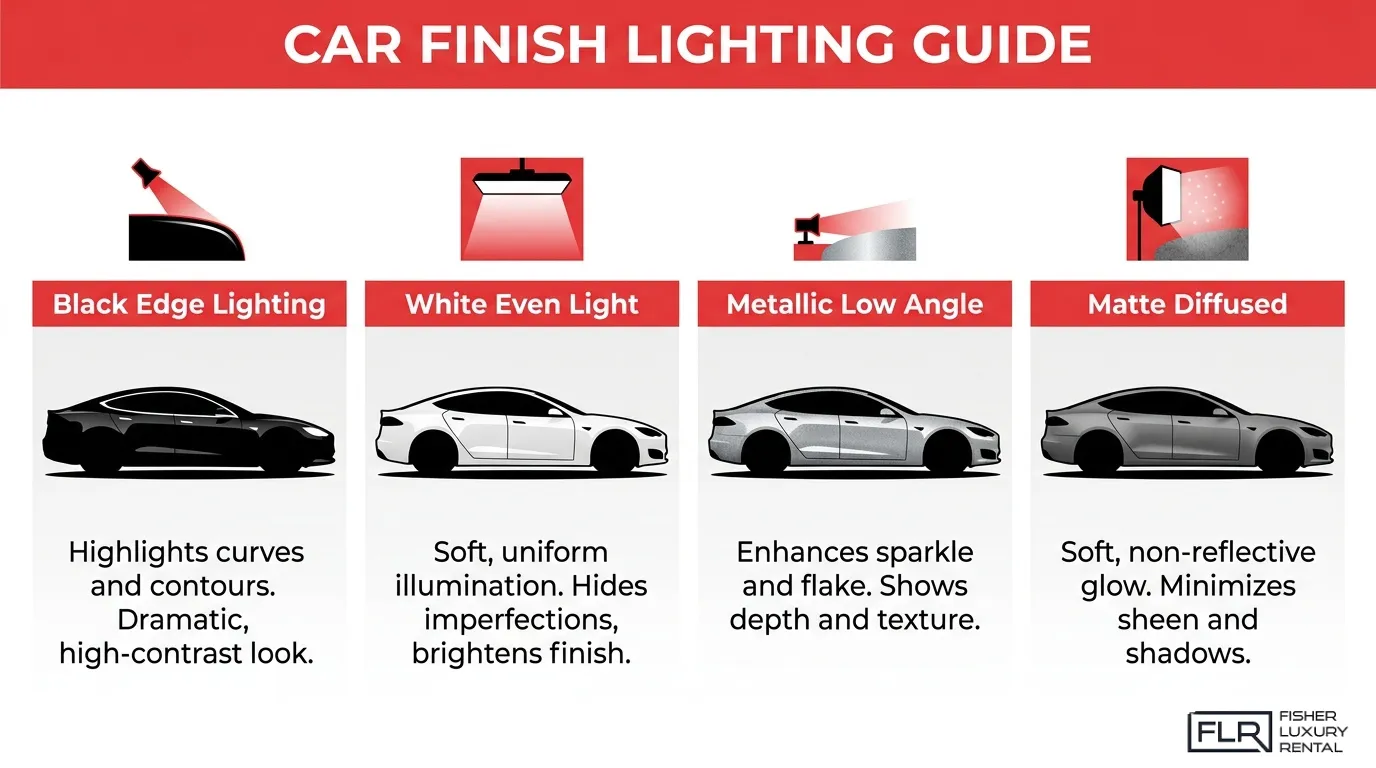
Lighting different car colors and finishes requires a tailored approach. The sections below cover black, white, metallic, pearlescent, and matte or satin finishes.
How Do You Light a Black or Dark-Colored Car?
Black and dark-colored cars require edge lighting to define their shape against dark backgrounds. Without rim lights positioned at the sides and rear, the car’s body lines disappear into shadow, making it appear flat and featureless.
The most effective approach uses two side strip lights or softboxes aimed along the car’s flanks, creating thin highlights that trace the bodywork’s contours. A subtle fill light at the front prevents the hood and bumper from going completely black. Avoid placing bright sources directly overhead, as this produces distracting hot spots on the roof and bonnet without adding useful shape information.
How Do You Light a White or Light-Colored Car?
White and light-colored cars require controlled, even illumination to prevent the paint from blowing out to a featureless, detail-free bright mass. The challenge is the opposite of dark cars: too much light destroys texture rather than concealing it.
Reduce key light intensity compared to a darker subject and add gentle negative fill using black panels on one side. This creates subtle shadow gradients that restore the impression of depth and three-dimensional form. Keeping background brightness slightly lower than the car itself also helps the white paint read as white rather than merging with a bright backdrop.
How Do You Light Metallic or Pearlescent Paint Finishes?
Metallic and pearlescent finishes require precise lighting placement because their appearance shifts dramatically with the angle of the light source. According to Spyne, accurate lighting maintains correct paint and finish tones across metallic and pearl surfaces, defines shape and design lines, controls reflections on high-gloss areas, and supports faster buyer decisions.
Large, soft light sources placed at a low angle graze the surface effectively, activating the flake or pearl without creating blown specular hotspots. The key is using gradual, gradient-style reflections across wide panels rather than small, point-source highlights, which look artificial and obscure the paint’s true character.
How Do You Light Matte or Satin Wrap Finishes?
Matte and satin wrap finishes require diffused, low-contrast lighting because they absorb rather than reflect light, making specular hotspots and hard sources their biggest enemy. A single direct strobe or undiffused LED immediately creates an uneven bright patch that looks like contamination rather than intentional lighting.
Large softboxes or overcast natural light distribute illumination evenly across the wrap without generating any specular reflection. Avoid circular polarizers with these finishes, as the finish itself already suppresses glare and a polarizer simply reduces the usable light without adding any visual benefit. Getting the lighting right in-camera is especially important for matte wraps, since post-processing highlights are far harder to recover cleanly from a non-reflective surface.
What Are Common Car Photography Lighting Mistakes to Avoid?
Common car photography lighting mistakes include using the wrong gear, choosing poor locations, and neglecting vehicle preparation. According to SLR Lounge, the most frequent errors are skipping a quality tripod, omitting a circular polarizer, lacking remote triggers, selecting poor shooting locations, and photographing a dirty car.
The most impactful mistakes to eliminate are:
- Skipping a quality tripod: Camera shake ruins sharpness, especially in low-light golden hour or blue hour conditions.
- Not using a circular polarizer: Without one, reflections on paint and glass are difficult to control in post-processing.
- No remote trigger: Pressing the shutter manually introduces vibration, degrading image clarity during longer exposures.
- Poor location choice: Distracting backgrounds compete with the car and undermine the composition.
- Dirty car surfaces: Dust, water spots, and smudges catch harsh light and become prominent in high-resolution images.
In practice, skipping the tripod and polarizer are the costliest oversights. These two tools solve the majority of reflection, blur, and glare problems before you ever open an editing application.
How Do You Edit and Enhance Car Photos for Better Lighting?
Editing car photos for better lighting means adjusting exposure, contrast, color temperature, and highlight recovery in post-processing to bring out the vehicle’s best visual qualities. The H3s below cover the core editing workflow, key tools, and finishing techniques.
How Do You Correct Exposure and Contrast in Car Photos?
Exposure and contrast correction is the first step in editing car photos. Start by recovering blown highlights on glossy paint surfaces, then lift shadow detail to reveal body lines and trim. Adjusting the contrast slider shapes the tonal curve between bright reflections and deep shadows, which is essential for making a car’s design read clearly. A well-balanced exposure ensures the vehicle’s silhouette and finish translate accurately at every viewing size.
What Software Tools Are Best for Editing Car Photography?
The best software tools for editing car photography are Adobe Lightroom, Adobe Photoshop, and Capture One. Lightroom handles batch exposure adjustments and color grading efficiently, making it the preferred choice for large shoot volumes. Photoshop enables targeted retouching, such as removing stray reflections or compositing backgrounds. Capture One is favored for its precise color editor, which is particularly useful when matching metallic and pearl finishes to their real-world appearance.
How Do You Adjust White Balance for Accurate Paint Colors?
White balance adjustment corrects color casts introduced by the shooting environment, whether warm golden hour tones or the cool blue of an overcast sky. Set white balance in post by targeting a neutral gray surface on the vehicle, such as a tire sidewall or chrome trim. This anchors the color profile accurately. For luxury vehicles especially, accurate paint reproduction matters: professional photographs enhance the appeal of luxury cars by highlighting their features and aesthetics in a way that standard photos cannot, significantly boosting sales and buyer engagement, according to Snappr. For photographers looking to practice these techniques on a worthy subject, Fisher Luxury Rental offers top-trim exotic and luxury vehicles in Phoenix, AZ and Portland, OR that are maintained specifically for the kind of pristine, showroom-ready condition that demanding shoots require.
How Do You Retouch Reflections and Imperfections in Post?
Retouching reflections and imperfections in post involves using the healing brush, clone stamp, and masking tools to remove distracting environmental elements caught in the paint. Target unwanted sky reflections on hoods, light streaks on doors, and dust specks on glass. Selective luminosity masks let you darken a single overexposed panel without affecting the entire image. Keeping edits subtle preserves the car’s authentic finish rather than creating an artificially processed look.
How Do You Color Grade Car Photos for a Professional Look?
Color grading car photos for a professional look means applying a consistent tonal palette that complements the vehicle’s color and shoot environment. Split toning adds cool shadows and warm highlights for a cinematic feel, while HSL panel adjustments let you saturate or shift specific hues, such as deepening a red paint or cooling a silver finish. Keeping the grade consistent across a full shoot ensures a cohesive visual identity, which is particularly valuable for rental fleet or auction photography.
How Can You Capture Stunning Photos of a Luxury Rental Car?
Capturing stunning photos of a luxury rental car combines the right subject with the right techniques. The sections below cover how Fisher Luxury Rental elevates your car photography and summarize the key lighting takeaways from this guide.
Can Renting an Exotic Car From Fisher Luxury Rental Elevate Your Car Photography?
Yes, renting an exotic car from Fisher Luxury Rental can elevate your car photography by giving you access to meticulously maintained, top-trim luxury vehicles that reward every lighting technique covered in this guide. Professional photographs enhance the appeal of luxury cars by highlighting their features and aesthetics in a way that standard photos cannot, according to Snappr. Fisher Luxury Rental serves Phoenix, AZ, Scottsdale, AZ, Portland, OR, and Vancouver, WA, offering exotic and luxury vehicles kept clean and in showroom condition, two factors SLR Lounge identifies as among the most commonly overlooked in automotive photography. The global luxury car rental market was valued at USD 52.82 billion in 2025, according to Fortune Business Insights, reflecting strong demand for premium automotive experiences. For photographers, a pristine exotic rental removes one of the biggest variables from a shoot before you even set up your first shot.
What Are the Key Takeaways About Car Photography Lighting Tips and Techniques We Covered?
The key takeaways about car photography lighting tips and techniques are the practical decisions that separate good shots from exceptional ones. The most actionable lessons from this guide are:
- Choose your light window carefully. Golden hour and blue hour deliver the most flattering, naturally dramatic results for any car finish.
- Use a circular polarizing filter. Position it at 90 degrees to the sun to control reflections on paint and glass.
- Match ISO to conditions. Daytime shoots need ISO 100–200; golden hour and overcast skies call for ISO 200–400; night shoots start at ISO 800–1600.
- Control your location and surface. Poor location choice and a dirty car are among the most common and avoidable mistakes in automotive photography.
- Use light painting for dramatic indoor or night results. Set Manual mode at ISO 100–200, f/11, and a 10–30 second exposure for precise creative control.
- Start with natural light. The majority of successful car photos rely primarily on natural light, with artificial lighting used as a complement rather than a replacement.
Mastering these fundamentals with a quality subject, like an exotic rental from Fisher Luxury Rental, gives every technique its best possible result.